涨姿势了,殊途同归的图片交互动效制作!
最近,在 CodePen 上,看到一个非常有意思的图片动效,效果如下:
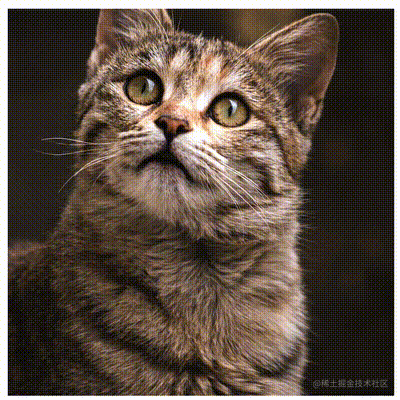
原效果链接:CodePen Demo - 1 div pure CSS blinds staggered animation in 13 declarations[1]
本身这个动画效果,并没有多惊艳。惊艳的地方在于原作者的实现方式非常有趣,我们简单来看看:
<div></div>
$base: "https://images.unsplash.com/";
$imid: "1608848461950-0fe51dfc41cb";
$size: 800;

/* declarations 1 through 3 are for layout */
html,
body,
div {
  display: grid;
} /* 1 */

html {
  height: 100%;
} /* 2 */

div {
  place-self: center; /* 3 */
  background: /* cat image */ url("#{$base}photo-#{$imid}?w=#{$size}") 50% /
    cover; /* 4 */

  &::after {
    padding: 200px; /* 5 size element */
    background: /* blinds */
   /* top to bottom 50% lightness grey to white
    * repeating gradient (16 repetitions) */
   /* slightly lighter than 50% grey to fix Chrome on Android glitch */ repeating-linear-gradient(
        hsl(0, 0%, 52.5%),
        #fff 6.25%
      ),
      /* 50% lightness grey to white gradient
    * the top third of the gradient is fully grey
    * the middle third is the gradient transition
    * from the 50% lightness grey of the first third
    * to white, which also covers the bottom third */
        /* extra black stop added to fix Chrome on Android glitch */
        linear-gradient(#000 33.3%, grey 0, #fff 66.7%) /* background height is 3x the element's height */
        0/ 100% 300%; /* 6 */
    /* for reference: this talk where I go into
   * the multiply blend mode (Chromium only slides)
   * https://codepen.io/thebabydino/project/full/ZjwjBe */
    background-blend-mode: multiply; /* 7 */
    /* use a very high contrast value to make
   * all greys darker than the 50% lightness one black
   * and all others white
   * from top to bottom, this gives us
   * horizontal white bands of increasing height
   * with black in between */
    filter: contrast(999); /* 8 */
    /* also detailed in the talk mentioned above
   * wherever this pseudo is white, result of blending
   * with parent (with cat background) is white;
   * wherever this pseudo is black, result of blending
   * with parent is the parent (cat background here) */
    mix-blend-mode: screen; /* 9 */
    /* background-position animation goes back and forth */
    animation: p 1s linear infinite alternate; /* 10 */
    content: ""; /* 11 necesarry for pseudo to show up */
  }
}

@keyframes p {
  /* cat is covered by grey top third of tall gradient,
  * which results in a fully black pseudo after
  * blending backgrounds & applying contrast
  * => result after blending it with the cat is the cat*/
  0%,
  25% {
    background-position: 0 0;
  } /* 12 */
  /* cat is covered by white bottom third of tall gradient,
  * which results in a fully white pseudo after
  * blending backgrounds & applying contrast
  * => fully white result after blending with cat */
  75%,
  100% {
    background-position: 0 100%;
  } /* 13 */
}
怎么样,实际代码行数不错,大部分是注释。
整个效果的核心是利用了渐变 + mix-blend-mode、background-blend-mode 以及滤镜 filter。相信大部分人看到上述的代码不调试一番是不知道到底发生了啥的。(我也是)
当然,本文不是来剖析原作者的构思巧妙,而是想就着这个效果,思考一下,在 CSS 中,我们是否有办法使用其他方式,快速还原同样的动画效果?
答案是肯定的。接下来,我们就使用 CSS @property 和 mask 的组合,快速还原上述动画效果。
动画分解
其实上面的动画,整体而言可以拆解成两个部分。
- 向上遮罩消失动画
首先,我们需要实现这么一个向上的遮罩消失动画:

方法很多,但是最适合用于实现这类效果的是 mask 或者 clip-path,当然,需要配合上 CSS @property。
我们使用 mask 配合上 CSS @property,这个效果其实很简单,代码如下
<div></div>
@property --per {
  syntax: "<percentage>";
  inherits: false;
  initial-value: 100%;
}

div {
  background: url(https://picsum.photos/400/400?random=100);
  width: 400px;
  height: 400px;
  mask: linear-gradient(
    #000,
    #000 var(--per),
    transparent var(--per),
    transparent
  );
  animation: change 3s infinite linear;
}

@keyframes change {
  0%,
  60% {
    --per: 100%;
  }
  70%,
  100% {
    --per: 0%;
  }
}
核心就在于设定了这样一个 mask – linear-gradient(#000, #000 var(--per), transparent var(--per), transparent),其中 --per 这个 CSS 变量的值表示的就是透明与显示状态的一个百分比值。动画过程中,只需要动态的将这个百分比值从 100% 修改为 0% 即可完成向上遮罩消失动画。
这样,我们就得到了这么个效果:

如果你对 mask 和 CSS @property 的用法还不是很熟悉,建议你先看看这两篇,补齐一下基础知识:
- 百叶窗动画
其次,我们需要实现一个百叶窗动画效果,像是这样:
在理解了上面的向上遮罩消失动画后,其实这里的百叶窗动画只是迷你版本的向上遮罩消失动画。
与上述的代码完全一致,只是调整一下 mask-size 即可。
@property --per {
  syntax: "<percentage>";
  inherits: false;
  initial-value: 100%;
}

div {
  background: url(https://picsum.photos/400/400?random=100);
  width: 400px;
  height: 400px;
  mask: linear-gradient(
    #000,
    #000 var(--per),
    transparent var(--per),
    transparent
  );
  mask-size: 100px 20px;
  animation: change 3s infinite linear;
}

@keyframes change {
  0%,
  60% {
    --per: 100%;
  }
  70%,
  100% {
    --per: 0%;
  }
}
注意,上面的代码与第一段代码几乎完全一致,仅仅在于多加了 mask-size: 100px 20px。这样,我们就快速的得到了百叶窗的切换动画效果:

- 结合向上遮罩消失动画与百叶窗动画
有了上述两个动画,其实我们只需要把它们结合一下,就可以得到文章一开头的效果。
完整的代码如下:
@property --per {
  syntax: "<percentage>";
  inherits: false;
  initial-value: 100%;
}

div {
  background: url(https://picsum.photos/400/400?random=100);
  width: 400px;
  height: 400px;
  mask: linear-gradient(
      #000,
      #000 var(--per),
      transparent var(--per),
      transparent
    ), linear-gradient(#000, #000 var(--per), transparent var(--per), transparent);
  mask-size: 100px 20px, 100% 100%;
  animation: change 3s infinite linear;
}

@keyframes change {
  0%,
  60% {
    --per: 100%;
  }
  70%,
  100% {
    --per: 0%;
  }
}
这样,我们就成功的利用了一种其它方式,还原了文章一开头的动画效果:

CodePen Demo – Image Hover Effect[4]
扩展延伸
当然,掌握了上述动画的技巧后,我们完全可以进行一些延伸尝试。
譬如,我们可以把上面 mask 的 linear-gradient() 替换成 radial-gradient()。
原理也是一样的:
@property --per1 {
  syntax: "<length>";
  inherits: false;
  initial-value: 20px;
}
@property --per2 {
  syntax: "<percentage>";
  inherits: false;
  initial-value: 0%;
}

div {
  background: url(https://picsum.photos/400/400?random=100);
  width: 400px;
  height: 400px;
  mask: repeating-radial-gradient(
      #000,
      #000 var(--per1),
      transparent var(--per1),
      transparent 20px
    ), radial-gradient(transparent, transparent var(--per2), #000 var(--per2), #000);
  animation: change 3s infinite linear;
}

@keyframes change {
  0%,
  60% {
    --per1: 20px;
    --per2: 0%;
  }
  70%,
  100% {
    --per1: 0px;
    --per2: 100%;
  }
}
只是,这里我们用到了两个 CSS @property 变量。这样,就实现了一个环形的递进向外的百叶窗消失动画:
稍加改造,就能实现 Hover 交互效果:
div {
  cursor: pointer;
  transition: --per1 0.3s, --per2 0.3s;
}
div:hover {
  --per1: 0px;
  --per2: 100%;
}
一个非常有意思的 Hover 效果就实现了:
完整的代码,你可以戳这里:CodePen Demo – Image Hover Effect[5]
最后
想 Get 到最有意思的 CSS 资讯,千万不要错过我的公众号 – iCSS 前端趣闻 😄
更多精彩 CSS 技术文章汇总在我的 Github – iCSS[6] ,持续更新,欢迎点个 star 订阅收藏。
如果还有什么疑问或者建议,可以多多交流,原创文章,文笔有限,才疏学浅,文中若有不正之处,万望告知。
参考资料
[1] CodePen Demo - 1 div pure CSS blinds staggered animation in 13 declarations: https://codepen.io/thebabydino/pen/MWPWXXw
[2] 奇妙的 CSS MASK: https://github.com/chokcoco/iCSS/issues/80
[3] CSS @property,让不可能变可能: https://github.com/chokcoco/iCSS/issues/109
[4] CodePen Demo – Image Hover Effect: https://codepen.io/Chokcoco/pen/gOBPZaQ?editors=1100
[5] CodePen Demo – Image Hover Effect: https://codepen.io/Chokcoco/pen/PoyZXgo
[6] Github – iCSS: https://github.com/chokcoco/iCSS